In the previous tutorial, had been discussed how to check topology error in QGIS with Topology Checker plugin. Some topology errors such as dangle (overshoot, undershoot), overlap and gaps are successfully detected using the topology checker plugin with defining rules in the topology rule settings. There is one question still remain, how to clean the topology error?
The best way to clean topology error is by manual editing, but it's tiring and time consuming. Fortunately, there are some tools that can be used to clean topology error in QGIS such as geometry checker and Grass v.clean tool. But must be kept in mind, using the tools not always working perfectly for any cases, but at least it could save time and speed up the process in cleaning topology error.
Then the processing toolbox will appear. Type clean, the v.clean tool will appear under GRASS commands tool as in figure 2. Actually there are two tools appear v.clean and v.clean.advanced. What is the
difference? The difference is: v.clean allow us to do one process in one
time, while v.clean.advanced allow us to do more.
In cleaning dangle errors, we use v.clean.advanced tool, because we will apply several steps, such as break, snap and remove dangle. Follow these steps to clean the error.
1. Open v.clean.advanced. The window of v.clean.advanced will appear as in figure 3.
2. Select Road layer for Layer to clean.
3. Then we apply three cleaning process: break, snap and remove dangle. For that, type below Cleaning tools: break,snap,rmdangle.
4. In the Threshold, fill with 0,5,5. Those are the threshold for each process. In this case I defined 0 for break. For break it is just a dummy value, because it does not need a threshold value. For snap and remove dangle the threshold value is 5. Threshold means the process will take into account if it is equal or less than the specified threshold value. Otherwise it will ignore it. That's why specifying an appropriate threshold value is very important. The threshold unit is in map unit.
5. The other parameters just leave as default. But if you want to explore more please free to change them and observe the result.
6. Push the Run button to start cleaning process.
Now let's see the result. I captured some parts of the result and compare them before and after the cleaning to see the difference. In figure 4, can be seen there is a gap between two road segments that can be considered as undershoot error. The error was fixed as in left picture. The two segments were joined together.
In figure 5 can be seen also undershoot error where a road segment does
not connect to another road segment. The error was fixed as in the right
picture. Both the error in figure 4 and 5 were fixed with snap process.
The best way to clean topology error is by manual editing, but it's tiring and time consuming. Fortunately, there are some tools that can be used to clean topology error in QGIS such as geometry checker and Grass v.clean tool. But must be kept in mind, using the tools not always working perfectly for any cases, but at least it could save time and speed up the process in cleaning topology error.
Clean Topology Error in Polyline Dataset
Firstly in this tutorial let's see how to clean topology error for dangles (undershoot and overshoot). To clean this error we use v.clean tool. The tool can be found in the toolbox. If the toolbox menu does not show up. At the top menu click Processing >> Toolbox as in figure 1. |
| Figure 1. Toolbox Menu |
 |
| Figure 2. Finding v.clean tool from Processing Toolbox |
1. Open v.clean.advanced. The window of v.clean.advanced will appear as in figure 3.
2. Select Road layer for Layer to clean.
3. Then we apply three cleaning process: break, snap and remove dangle. For that, type below Cleaning tools: break,snap,rmdangle.
4. In the Threshold, fill with 0,5,5. Those are the threshold for each process. In this case I defined 0 for break. For break it is just a dummy value, because it does not need a threshold value. For snap and remove dangle the threshold value is 5. Threshold means the process will take into account if it is equal or less than the specified threshold value. Otherwise it will ignore it. That's why specifying an appropriate threshold value is very important. The threshold unit is in map unit.
5. The other parameters just leave as default. But if you want to explore more please free to change them and observe the result.
6. Push the Run button to start cleaning process.
 |
| Figure 3. v.clean.advanced tool window |
 and the clean result") |
| Figure 4. Road gap (undershoot) and the clean result |
 | |||
| Figure 5. Undershoot error and the cleaning result |
Figure 6 shows the overshoot error, where a segment road passes another segment with a length 5 meter or less (because we set the threshold 5, remember :)). The result of cleaning is shown in the right picture, which the overpass segment was cut with break process then the remain part was removed with remove dangle.
 |
| Figure 6. Overshoot error and the cleaning result |
Clean Topology Error in Polygon Data set
We have seen how to clean topology error for road data. What about topology error in polygon dataset such as overlap, gap and sliver polygon. How to clean these error? To clean the error we also use the v.clean.advanced tool. For this tutorial I used a building dataset with overlap and gap error as in figure7.
 |
| Figure 7. Building dataset with topology error |
1. Open v.clean.advanced.tool.
2. To clean the error, there are three processes are needed to be done: break polygon, remove duplicate and remove area. Therefore, under Cleaning tools type: bpol, rmdupl,rmarea. See figure 8.
3. In the third step we must define threshold value. For bpol dan rmdupl we can just give a dummy value 0, but for remove area, I gave it 3. It means an area less or equal with 3 (map unit square) will be removed. Because of that it's very important to know about polygon area in the data. To do this we can make a field containing all polygon area. Sort the field and observe small area to help us in defining threshold value.
4. Leave the other parameter as default. You could change them, and observe the result.
5. Click Run button to start cleaning.
 |
| Figure 8. v.clean.advanced tool to clean polygon topology error |
 |
| Figure 9. Building topology error cleaned |
Clean Topology Error with Geometry Checker Plugin
Last part of this tutorial we will use Geometry Checker plugin to clean topology error. I would say, this tool more intuitive than v.clean and also can be used to detect geometry validity. Moreover we can use this tool to detect sliver polygon. To use Geometry Checker Plugin. Ensure to enable this plugin in the Plugin window as in figure 10. |
| Figure 10. Geometry Checker Plugin |
 |
| Figure 11. Check Geometries Tool |
1. Open Check Geometries tool. The window will appear as in figure 12.
2. In the window can be seen there are a lot of processes could be done such as to check geometry validity, properties, condition and of course topology.
3. We just deal with topology. So check No sliver polygons to not allow sliver polygon exist with maximum area 1 in map unit square.
4. Under topology checks part. Select Check for overlaps smaller than (map unit sqr) and Check for gaps smaller than (map unit sqr). I gave the threshold value for both 5. It means any area with overlap or gaps smaller than 5 square meter will be marked as error.
5. Save the result as a new file in create a new layer option.
6. Click Run to start processing.
 | |||
| Figure 12. Check Geometries window |
 |
| Figure 13. Check geometries topology error |
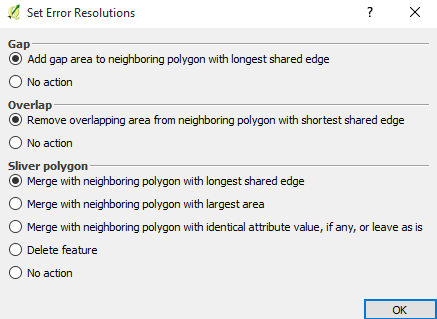 |
| Figure 14. Set Error Resolutions window |
 |
| Figure 15. Topology errors are fixed |
 |
| Figure 16. Different result of topology cleaning using v.clean and Check Geometries |
Overall, this tutorial has shown that topology errors can be cleaned using v.clean and Check Geometries tool in QGIS. The result from each tool could be different. And as mentioned earlier, using the tools not always working perfectly for any cases, but at least it could save time and speed up the process in cleaning topology error.
