We are living in a connected world that makes geodata borderless. It means anyone now can find and access any data that available online with GIS Services like Web Map Service (WMS). In the
previous post we had discussed how to find geospatial data easier and faster using open data network platform. This post will show how to add those data with WMS Service using open source GIS software QGIS.
There are many GIS Web Services method available as
Open Geospatial Consortium (OGC) standard, namely: Web Map Service (WMS), Web Coverage Service (WCS), Web Feature Service (WFS), Web Map Tile Service (WMTS). Each service defines different response of data access. For example WMS respons user request in form of static image, so a user can see the data in image, without any capabilities to change data style or to download the data. On the other hand WFS service gives more access to user to change data style and download the data.
Add WMS Service in QGIS
As a common user, of course we would like to have more access to open geodata. But unfortunately data provider mostly defined open geodata as WMS service. Therefore, we will look how to add a WMS service into QGIS. In this post I used
QGIS 2.18.3.
1. To add a WMS service layer in QGIS we are using a tool called Add WMS/WMTS Layer...... To get the tool just find menu Layer >> Add Layer >> Add WMS/WMTS Layer... as in figure 1.
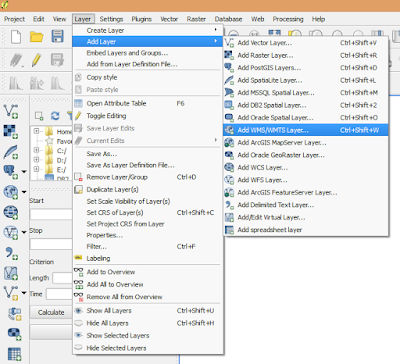 |
| Figure 1. Add WMS Tool in QGIS |
2. Then it will open an Add Layer from WM(T)S Server as in figure 2. Select New to create a new connection and fill the connection name and URL. For this case, I used a WMS service from
Center for International Earth Science Information Network(CIESIN). Therefore I gave the connection name CIESIN and URL path: https://sedac.ciesin.columbia.edu/geoserver/ows?
 |
| Figure 2. Add WMS Layer Window |
3. After step two. Do not forget to click OK. Then select Connect button. If the server is responding, then it will populate all layers available in the server as in figure 3. Select any layer that you want to display in QGIS and click Add button. For this case I selected Terrestrial Biomes from WWF.
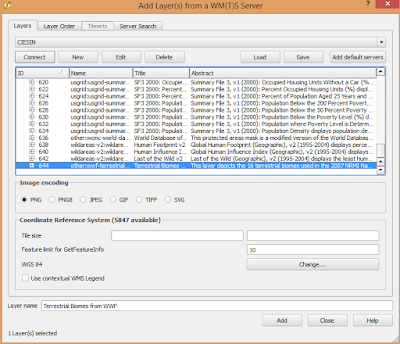 |
| Figure 3. WMS Layer List |
4. The selected layer then will be displayed in QGIS map window as in Figure 4. The feature's symbology already defined in the server, so we just get the symbol color and style as it is. Automatically the legend will appear below the layer's name in the layer panel.
 |
| Figure 4. WMS Layer in QGIS Map Window |
5. To get attribute information use the Identify Feature tool. Select the part of the map you want to identify. The identified information will display in an identify result window as in figure 5.
 |
| Figure 5. WMS Identify Result Window |
5. Play around with the layer. Explore what you can do with it. To do so, right click in the layer name and select Properties. The Properties window appears as in figure 6. There are some options on the left panel that we can seek like General, Style, Transparency, Metadata and Legend. As noted
before, there are not so many we can do with it. But at least we can customize the transparency of the returned WMS image.
 |
| Figure 6. WMS Properties Window |
That's all how to add a WMS service layer in QGIS. There are so many open geodata that we can access with WMS services. Find what you need, combine it with other information to get a better understanding from a problem that you analyze.
QGIS
Tutorial


